Tutorials
Step-by-step guides to building apps with NutshellPart 1: Creating & Populating a Database
Prefer to watch rather than read? There’s a video version of this tutorial in our Videos section – you can find it hereGo to the video.
Start by logging into your Nutshell instance. In the main navigation across the top, click on the Apps manager to see a list of all your apps. So far, if you’ve completed the “Hello World” tutorials, you’ll probably only have one app in there.
Let’s create a folder to keep all of our tutorial apps in. You’ll find a Create Folder button at the very bottom of the screen.

The Create Folder button can be found at the very bottom of the screen
Create a new folder and call it “Tutorials”. Nutshell will create the folder and open it for you, which is helpful, but we want to put our “Hello World” app in here too.
Double-click on the Back Up icon in the top-left corner, to return to the Home folder.
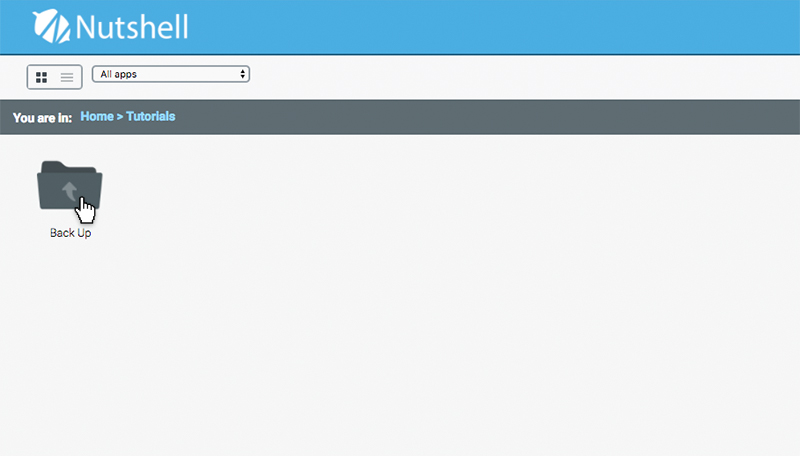
Double-click the Back Up icon to move back up to the Home folder
Now, click and drag your “Hello World” app over the top of your new folder, and then let go. This will drop the app into your new Tutorials folder. You might need to refresh the page to see the change.
Double-click the Tutorials folder to open it.
You should see your “Hello World” app in there now. While you’re in the Tutorials folder, we can create a new database-driven app called “Address Book”.
Click the Create App button at the very bottom of the screen, and give it the name “Address Book”. Nutshell will create your new app in the Tutorials folder, and open it in the builder.
This new app will be designed to work best on a Smartphone, so open the Settings tab (down the left-hand side of the builder) and set your app to Smartphone in Portrait orientation.
All of these things were covered in the Hello World tutorial, so we won’t go through all the detail again here.
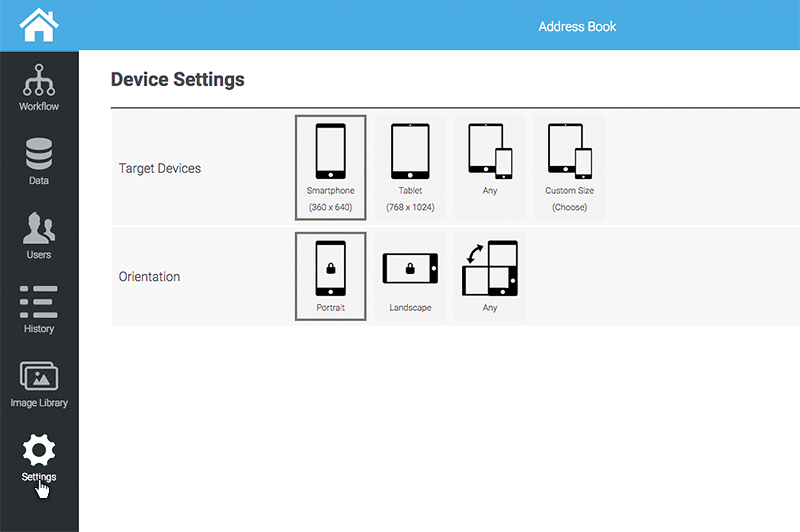
Optimise the Nutshell builder for Smartphone devices in Portrait orientation
Switch back to your workflow, and let’s start building our Address Book app.
Our Address Book app is going to keep track of contacts, and our contacts are going to be stored in a database. So, the first thing we’re going to need is a way to add new contacts to the database.
Which means we need a form.
Creating a Form
There are lots of fields you might add to an Address Book app, but we want to keep things simple for the sake of this tutorial, so we’re going to store the following:
- Name (text field)
- Email Address (text field)
- Telephone Number (text field)
- Department (chosen from a dropdown list)
Feel free to add as many fields as you like to your own version of this app, and experiment with all of the form components Nutshell has in its toolbar. First thing’s first though – we need a screen.
Change the toolbar to Essentials, and add a Screen component to the canvas.
This will be our “Add Contact” form, so change its label to “Add Contact”. This will become very important later when we’ve got a few screens in our workflow and we need to differentiate one from the other at-a-glance.
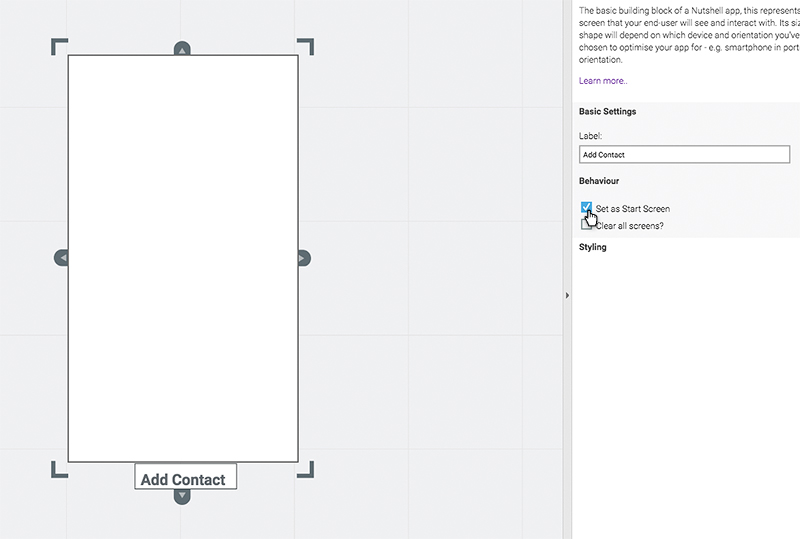
Don’t forget to set your new screen as Start Screen
Now would also be a good time to set this as the Start Screen.
To keep this tutorial nice and short, we’re going to be using the default styling that Nutshell applies to all of our components. The default styles look tidy, and are based on mobile usability best-practices, so they’re a pretty safe choice.
Of course, you can always customise the look and feel of your app later using the Styling properties, if you wish.
Let’s start with a title for our screen, so that end-users know what they’re expected to do. Switch the toolbar to Visuals and drag a Text component onto the screen. It’ll snap neatly to the top of the screen.
In the Properties panel, change its style from “Paragraph” to “Title”, and click the Edit Text Content button to change the wording. Let’s change the title to “Add New Contact”. You should end up with something like this:
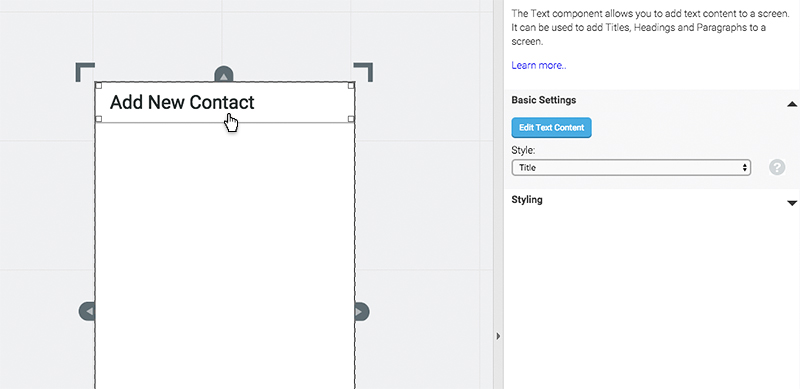
It’s always a good idea to include a clear title on each screen
Now let’s add some form fields with which to capture data. Switch the toolbar to Forms to see the range of form fields Nutshell has to offer. We only need a few of them for this app.
First, drag a Text Field to the screen. This will be our “Name” field, so in the Properties panel, give it a Reference of “Name” and turn off Validate Field and Required Field for now.
These settings are useful if you need to ensure that end-users never leave a field blank, or enter data that mightn’t fit requirements – for example, a valid email address. But we want to keep things simple, so we’ll turn them off for now.
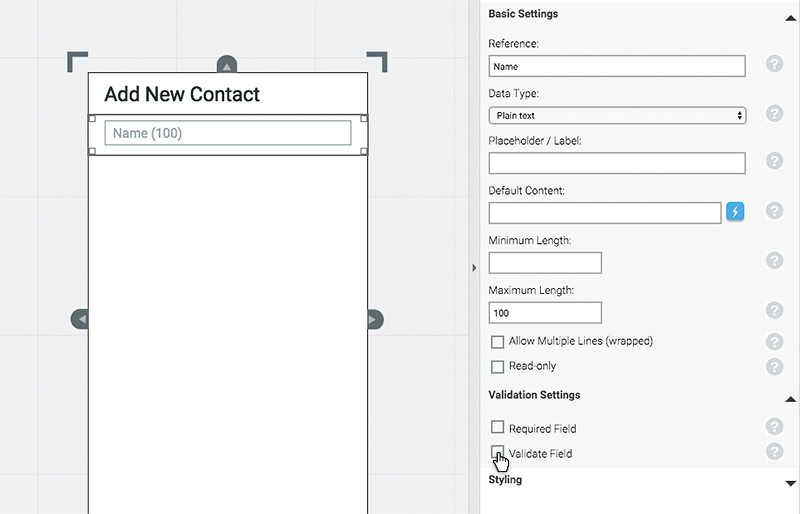
Turn off Validate Field and Required Field for now
We could do with a label for our form; something to tell the end-user what they should be typing into the field.
Go back to the toolbar and drag a Label component onto the screen. The Label component is just like the Text component, in that you double-click it to open the in-line text-editor.
Change the Label text to “Name” and click anywhere outside the editor to save the changes. Now, the only problem is, the Label is underneath the Text Field!
Shuffle them around, so that the Label is on top.
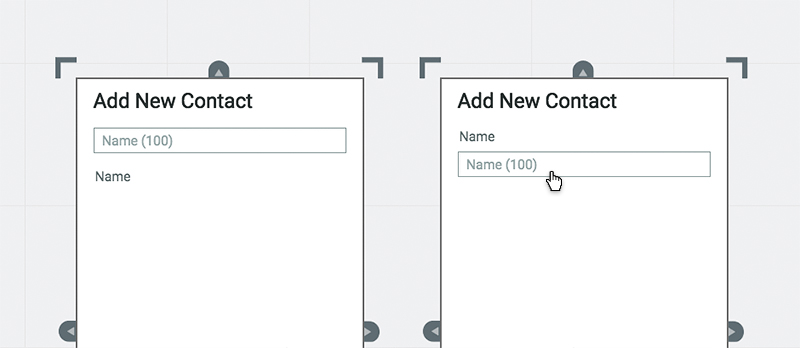
Shuffle the Text field and Label around so that the Label is on top (right)
That’s better.
Now repeat this process for the Email and Telephone fields.
They’re both Text Fields too, so the process is identical. Just make sure you give them an appropriate Reference value – i.e. an email field with a Reference “Email” and a Telephone field with a Reference “Telephone”.
You should end up with something like this:
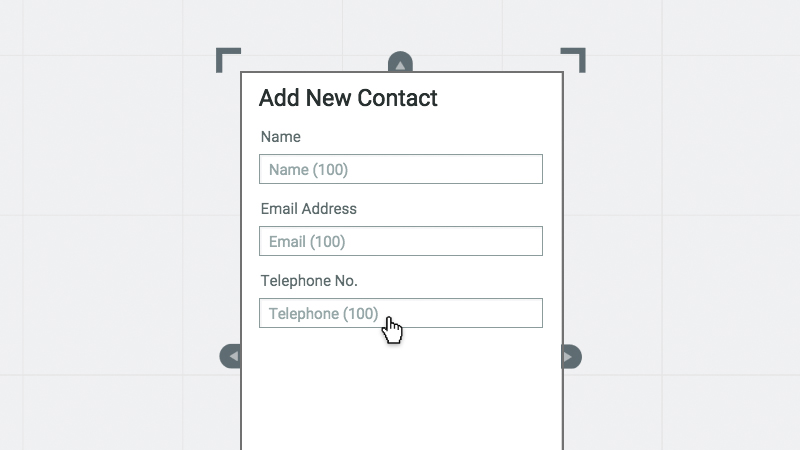
All three Text field added and configured
Now we need to add the Department field, which will be populated from a dropdown list of pre-defined values: “Marketing”, “Development” and “Customer Services”. We can do this with a List Box component.
Drag and drop a List Box component from the Forms toolbar onto your screen, and look at the Properties panel.
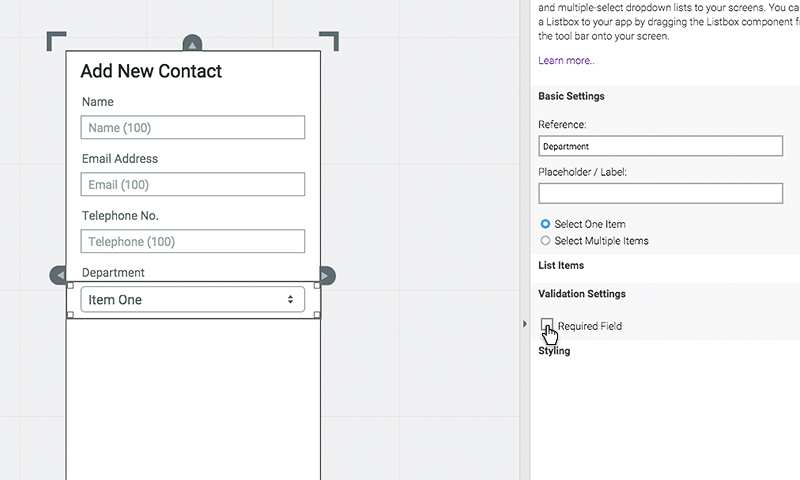
Give your List Box an appropriate Reference and turn Required Field off for now
Start by giving your List Box a Reference of “Department”, and turn off Required Field option under Validation Settings for the time being. Now, we just need to add some options to our List Box.
Expand the List Items section of the Properties panel.
We only want our end-user to select a single item, and we don’t want to pull our list items dynamically from another database, so we can leave most of the settings at their defaults.
We want our List Items to be static (i.e. they’re unlikely to change), so we need to hand-type them into the box under List Options in the Properties panel.
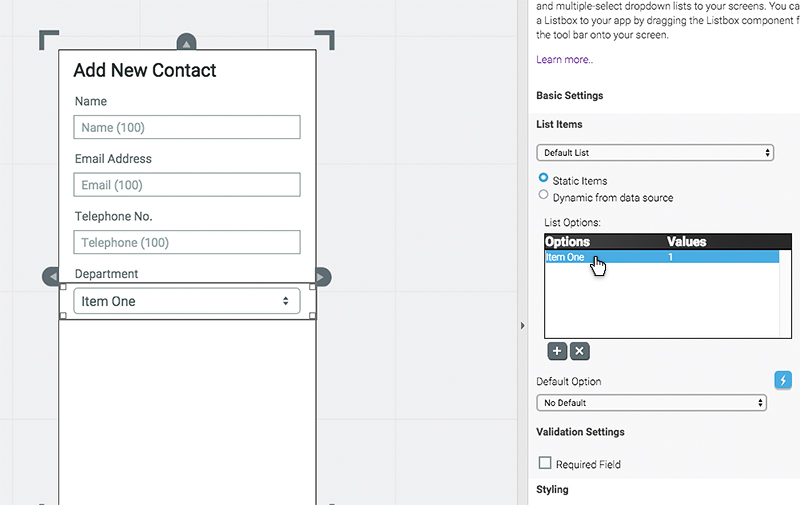
Our Listbox already has one option called “Item One” available
Start by changing “Item One” to “Marketing”. Then use the little + button underneath the box to add two more, until your list looks something like this:
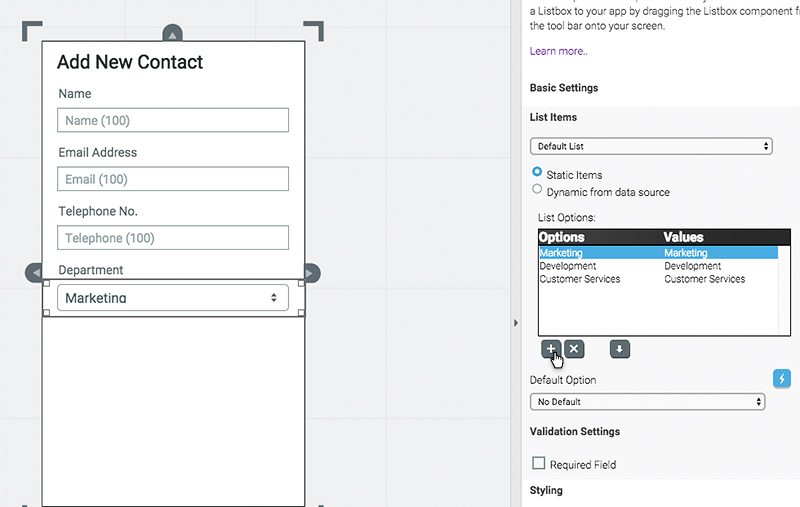
Our Department Listbox with all three options populated
The final piece of our form is an “Add” button, which will save the new contact to our database. Drag and drop a Button component from the Forms toolbar, and give it an appropriate Reference and Label, like this:
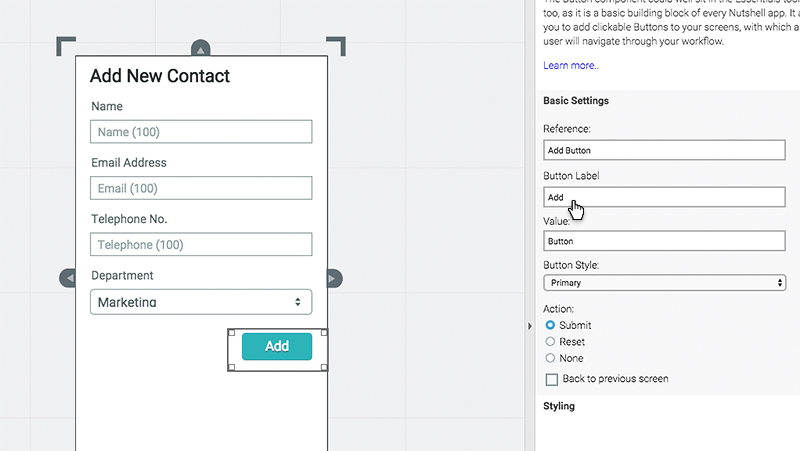
An Add button completes our form
Now that we’ve got a form to capture data, we just need somewhere to put it. For this, we’ll need to create a Database Table.
Creating a Database Table
Database tables in Nutshell can be shared between several apps, allowing you to have lots of different people contributing to the same database in different ways. This means that database tables need to be set-up outside of your app.
Click on the little Home icon in the top-left corner of the screen to return to Nutshell. Once you’ve arrived, choose Database from the main navigation.
If this is the first time you’ve used databases in Nutshell, you probably won’t have any tables yet. Click the Create New Table button in the top-right hand corner of the screen.
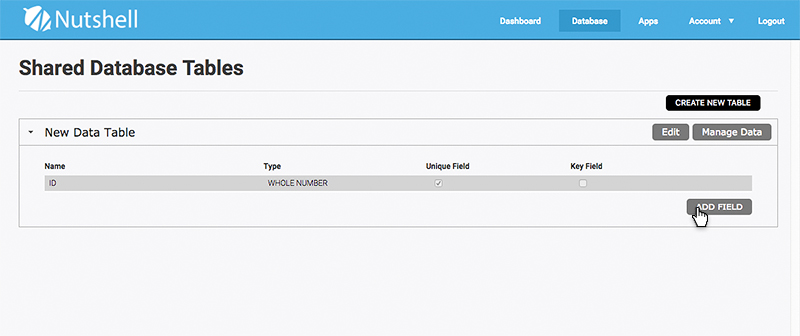
A new Database table is created for you, with an ID column added by default
Once our table is created, we can begin setting it up. Let’s start by adding the fields we need, by clicking on the Add Field button at the bottom of the table. Each time you click Add Field, another field will be added.
We need to add four fields in total – one each for Name, Email, Telephone and Department. Each field has a Type, which tells Nutshell what kind of data will be stored in it – for example a date, email, a number of a string of text.
This comes in really useful further down the line, when Nutshell can make some smart decisions based on the data-types you’re storing – for instance, making sure you don’t accidentally insert location time/date information into a map!
For now, Name, Email and Telephone can all be left at the default data-type of “Text (256 characters)” which is just plain text, up to a maximum length of 256 characters. Department, however, is a List Box, so it’s Type needs to be changed to “List Items”.
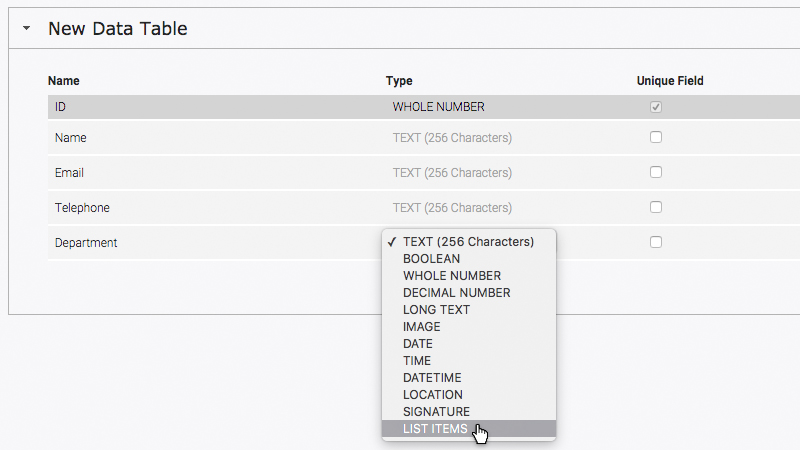
Set the Department field to “List Items” type
Finally, we want to make sure a contact is only ever entered once, so that we don’t end up with lots of duplicates. To do this, let’s set the Email field to be unique, by ticking its Unique Field checkbox.
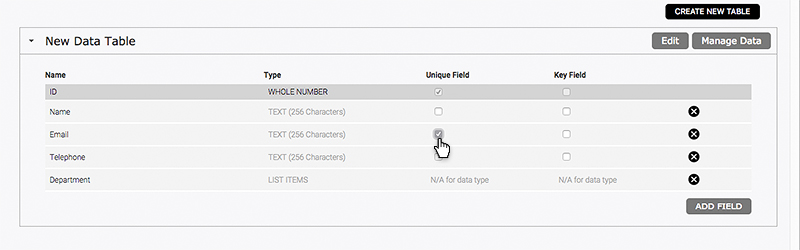
With this checkbox ticked, Nutshell will make sure that no two Email values are the same
So, that’s our database fields set-up. All we need to do now is share this database with our Address Book app.
Sharing a Database Table
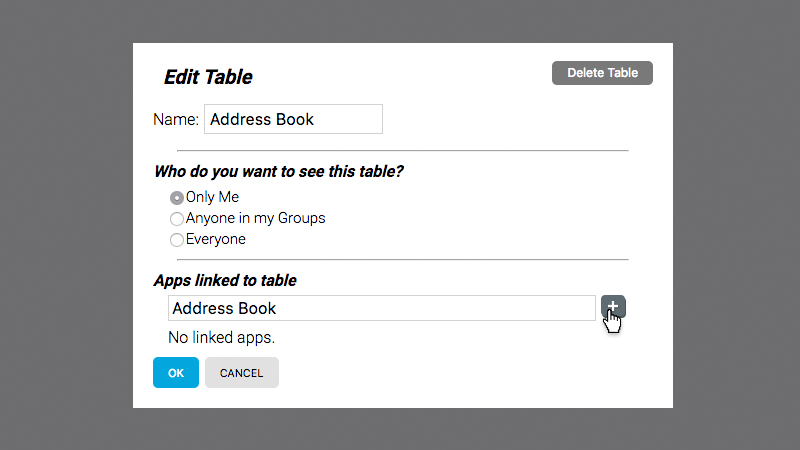
To make your database table available to your app, click the Edit button in the top-right hand corner of the database table.
The table settings will appear in an overlay. Before we share the table, let’s give it a name that we’ll recognise easily later on, when there might be hundreds of Database tables in our account.
Change the Name of your database table to “Address Book”.
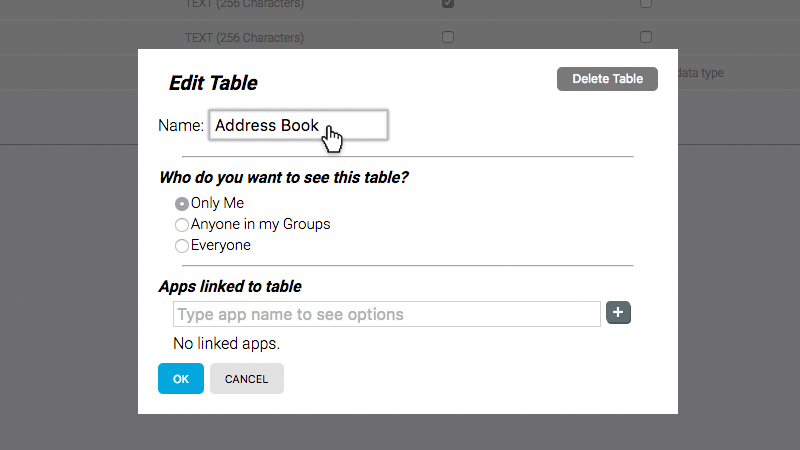
Give your new table a name that you’ll recognise later
Next we’re going link this database table to our Address Book app, so that it can access it.
At the bottom of the window, you’ll see a field for Apps linked to table. Start typing the name of your Address Book app into this field, and any matching apps will pop-up automatically in a list beneath it.
Click on the Address Book app to select it from the list.
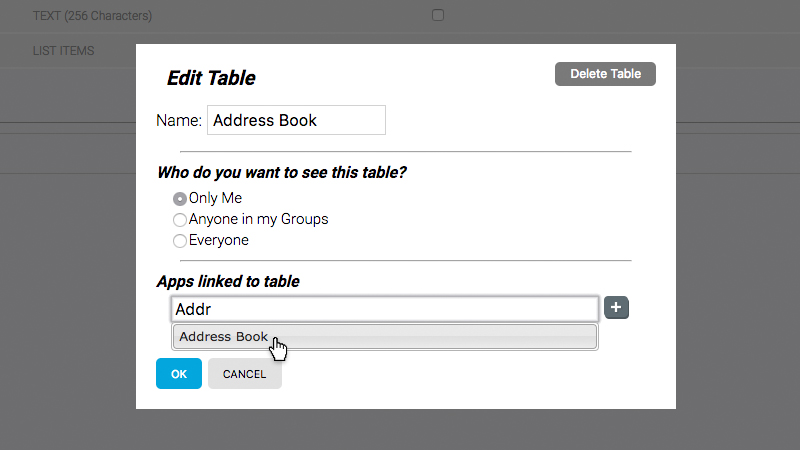
Start typing in the box and your Address Book app will appear in the list below
Select your app from the list, and be sure to click the little + button to the right of it, to add it to the list of apps linked to the table.
Don’t forget to click the + button
Your Address Book app is now linked to your Address Book database table.
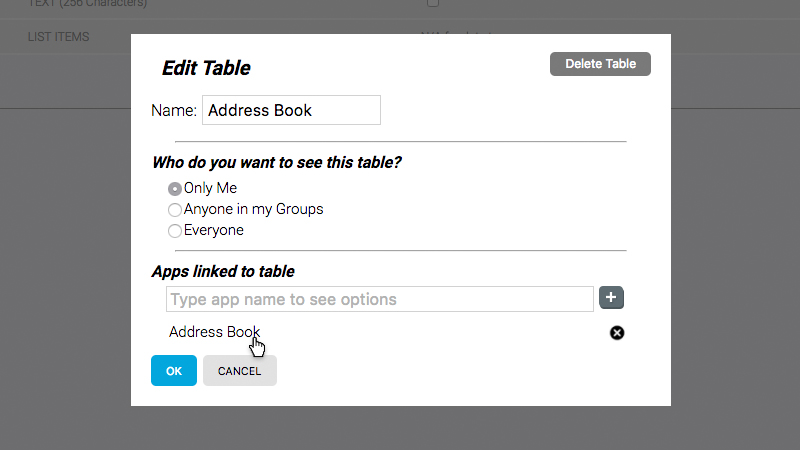
Your Address Book will appear in the list of apps linked to the table
You can link as many apps as you like to a database table, which is useful when you want different people – for example a field worker and their supervisor – to interact with the same data in different ways.
Now that your database table is linked to your app, we can go back and finish our Add New Contact form. Go back to the Apps page, and open your Address Book app in the Nutshell builder.
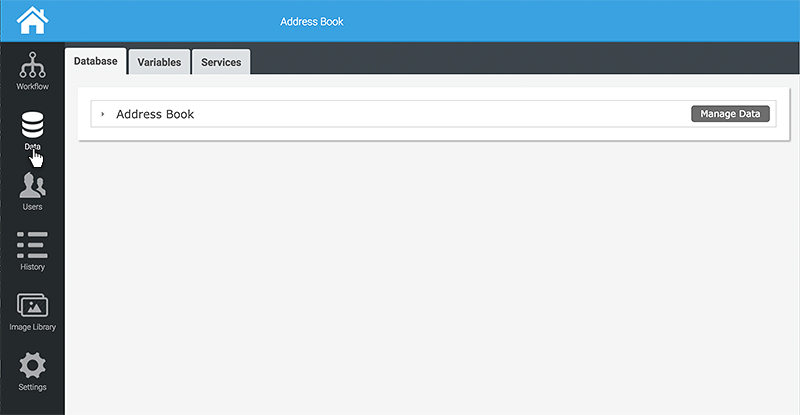
Your new Address Book database table now appears under the Data tab
If you open the Data (on the left-hand side) you’ll see that our Address Book database table is now available to your Address Book app. If you want to quickly insert some test data, or remind yourself which fields are available to you, you can find them here without having to leave the builder.
Now all that’s left to do is connect your Add New Contact form to your Address Book database. Switch back to your workflow.
Creating a New Database Record
Change the toolbar to Data. The first item in the Data toolbar is a component also called Data. Drag it to your canvas, and draw a link to it from your Add New Contact screen. Select your Data component on the canvas and look at the Properties panel.
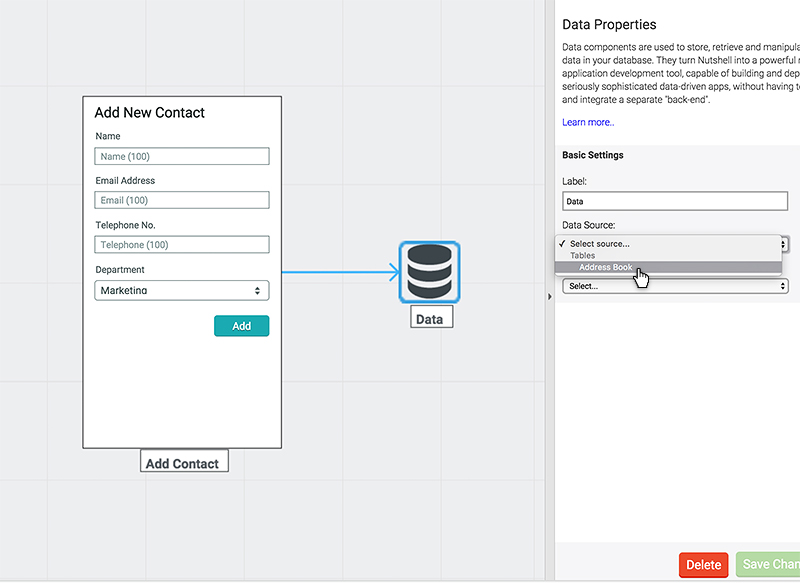
Select your new Data component on the canvas to see its properties
The first thing you’ll be asked for is a data source.
The Data component lets you read/write date from/to a given data source. In this case, our data source will be the Address Book table we’ve just set-up.
If you open the Data Source dropdown, you’ll see there’s only one database table available to our app – the one we created and linked earlier – Address Book.
Select this table, and then open the Action to Perform dropdown.
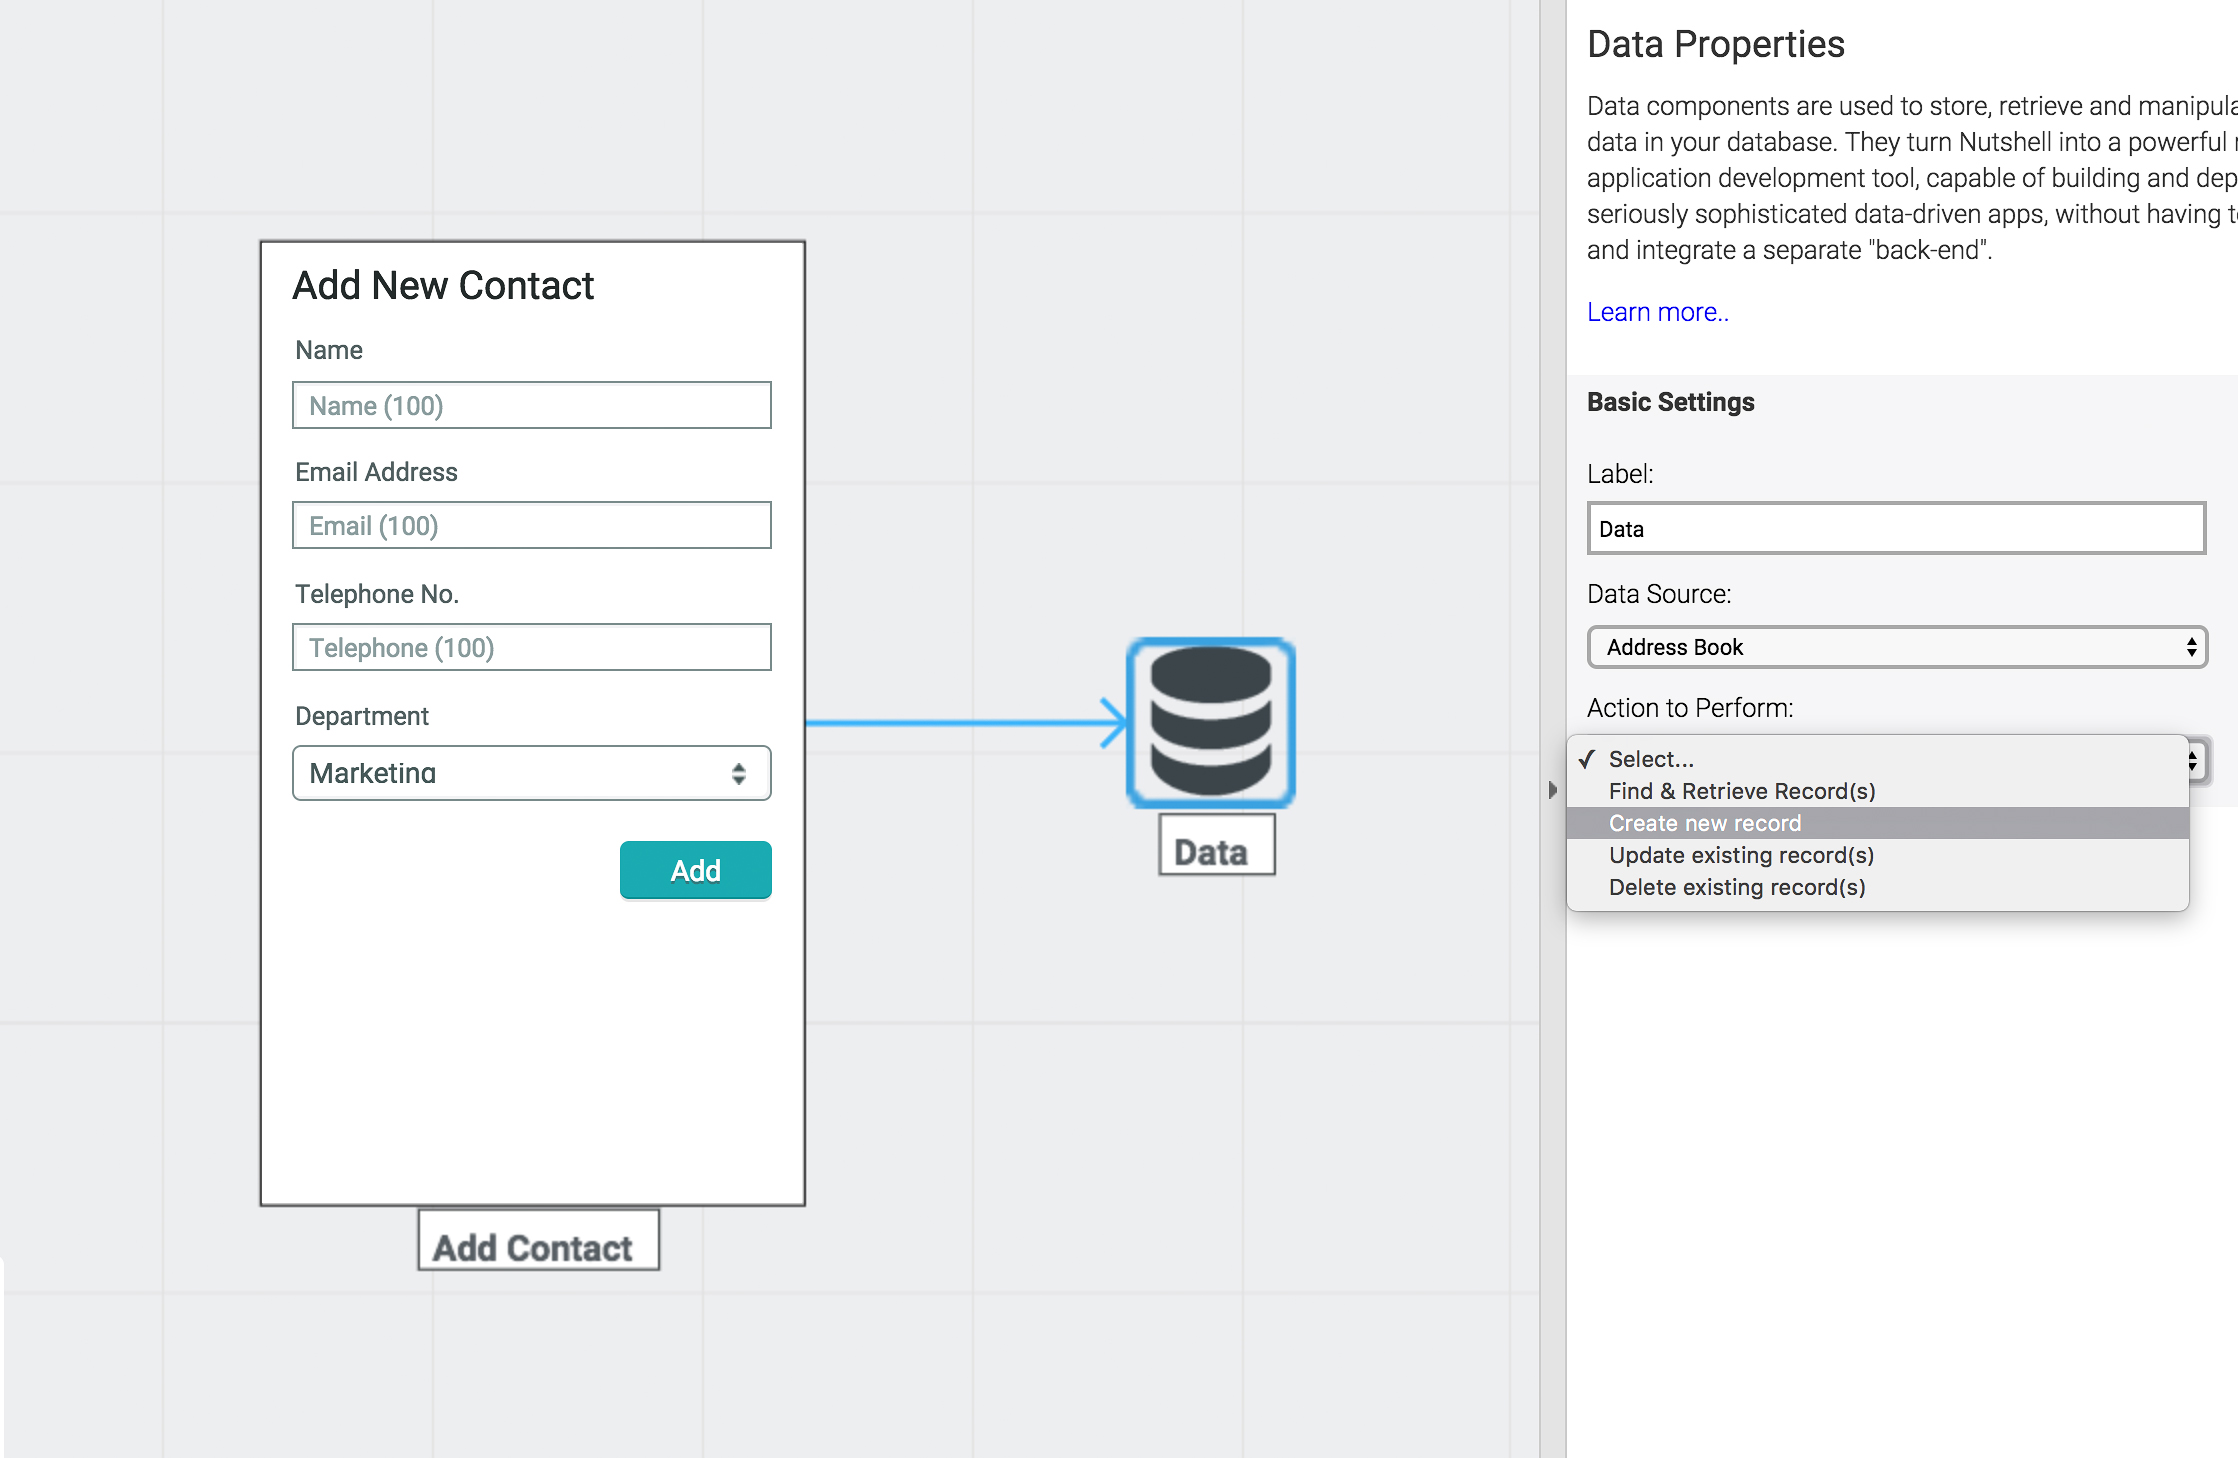
There are four possible actions we can perform with a Data component
There are four actions we can perform with a Data component:
- Find & Retrieve Records (all records, specific records or running a search query)
- Create new records
- Update existing records
- Delete existing records
For now, let’s focus on creating a new record. We’ll be covering the others in separate tutorials. Select Create new record and save your changes.
At the bottom of the Properties panel, you’ll see an Open Mapping Tool button appear. To create a new database record, we’ll need to tell Nutshell which of our form fields to insert into which of the database fields we set-up earlier.
This process is called “field mapping”, and can be done using the Nutshell Mapping Tool. Click the button to open it.
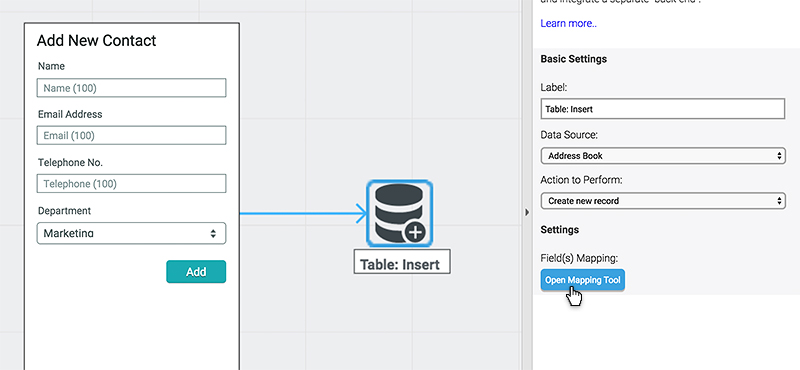
Click the Open Mapping Tool button to begin the field-mapping process
The mapping tool will open in an overlay. For each field in your database (in this case, there are four of them) Nutshell will ask you to choose the Screen/Form Field you’d like to insert.
Because the References we gave our form fields match exactly the names of our fields in the database table, Nutshell tries to auto-map our fields. In this case, it’s done a perfect job, inserting the correct form field into the appropriate database field.
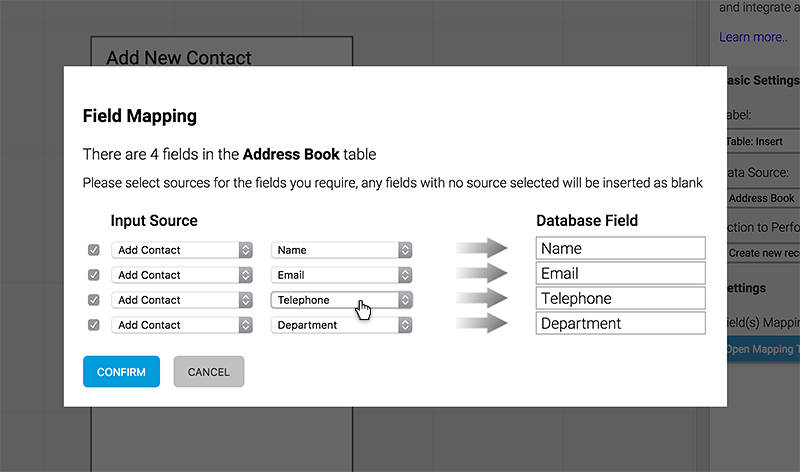
Nutshell will try to automatically map your fields if you name them consistently
If yours hasn’t mapped perfectly, you can change them manually. Just select the screen first, then the appropriate form field for each database field. If you’d prefer to ignore a field, you can untick its box and Nutshell will disregard it.
In this instance, Nutshell has auto-mapped our fields perfectly, so we can just hit Confirm to finish up.
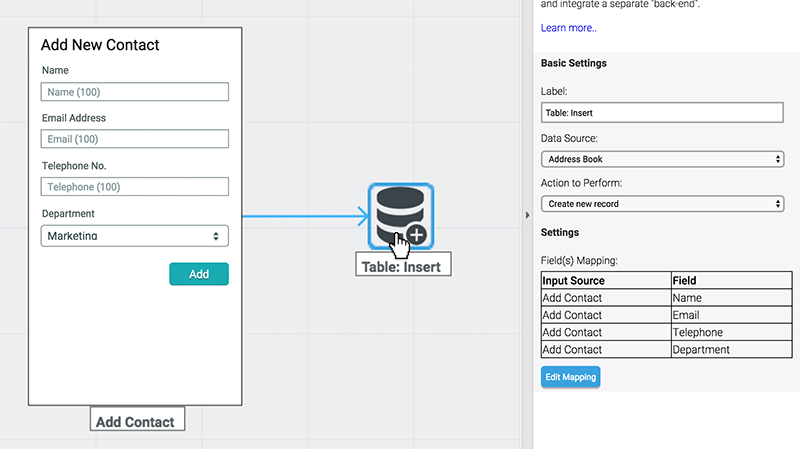
The Properties panel updates to give you a quick overview of which fields have been mapped
The first thing you’ll notice is that the Properties panel is updated, with a list of fields that have been mapped. This can come in useful later if you add more fields, and can’t remember if they’ve all been mapped or not.
The other thing you’ll notice is that the data component on the canvas has also been updated, with a new icon (sporting a little ‘+’ symbol to indicate that a new record is being created) and a new label.
Of course, you can change the label to something more meaningful if you like.
Time to preview our app, and check that it inserts a database record.
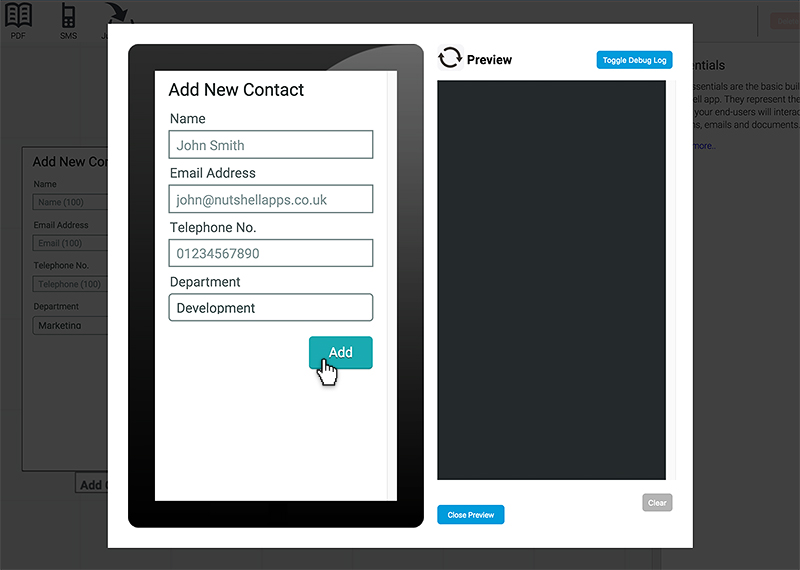
Fire-up your app and fill in the form
Hit Preview and fill in your Add New Contact form like an end-user would. Hit the Add button.
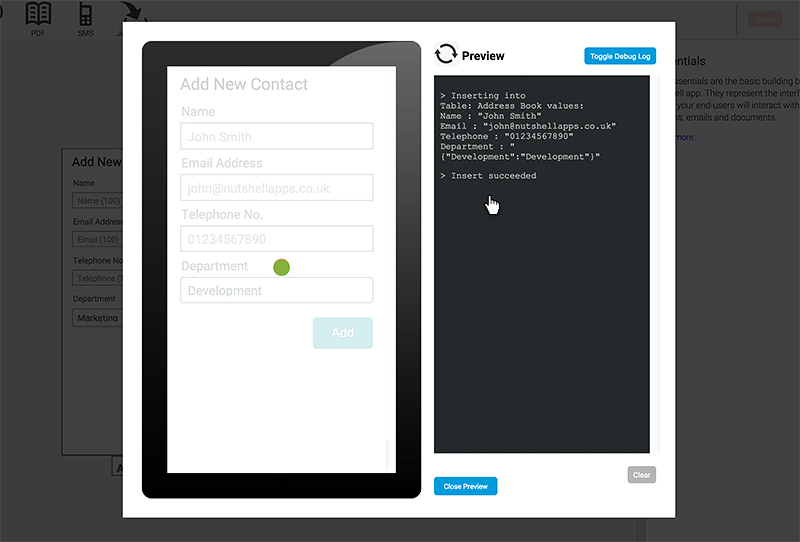
The Debug Log on the right-hand side tells you what’s going on behind the scenes
The Debug console (the big dark block on the right-hand side of the Preview panel) suddenly becomes very active. It tells you what’s happening in the background. In this case, it’s telling us that our database record was created and inserted into the Address Book table.
It even gives us a read-out of what data was written to each field, which is especially useful. Finally, it tells us that the insert succeeded. The new record should be sitting in our new database table. If only there was a way of checking.
There is.
Close the preview, and open the Data tab on the left-hand side of the builder again.
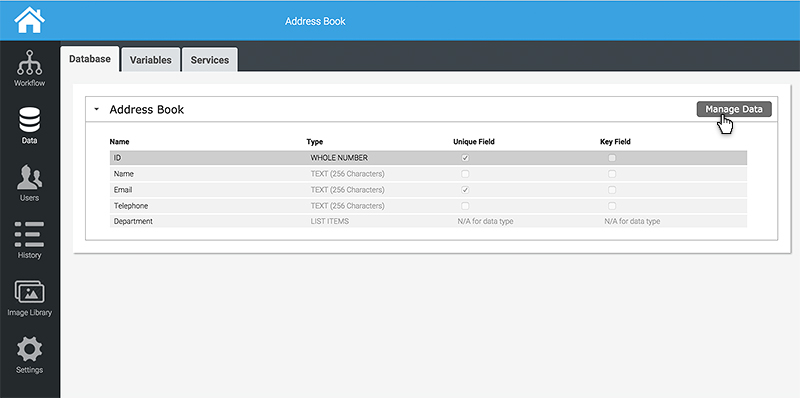
With your Address Book table expanded, you’ll see a Manage Data button on the right-hand side
With your Address Book database table expanded, you’ll see a Manage Data button on the right-hand side. This will allow you to see and manipulate the data within the table.
It’ll ask if you want to see Preview or Device data. Nutshell maintains two versions of every database table you create – Preview and Device. The Preview version is used when running your app in Preview or publishing in Test mode. The Device version is used only when running the app published in Live mode.
This allows you to maintain a dummy database table filled with test data, while keeping your ‘live’ data clean.
Since you filled the form in whilst running the app in Preview, choose Preview Mode, and you’ll see your new data record, just as you typed it.
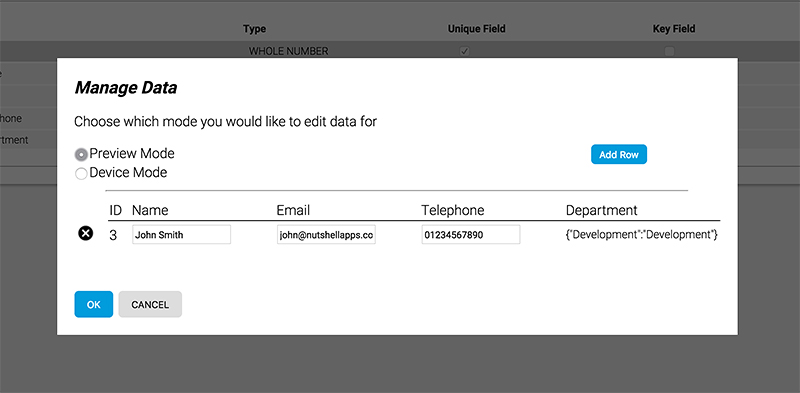
You should see your new data record as you entered it
So, that’s it.
We’ve created a simple mobile app that writes data to a persistent database in only a few minutes, without writing a single line of code. Now all we need is a way to interrogate that data.
In the next tutorial, we’ll learn how to pull contacts out of our database table and display them in a list on our screen. We might even add a search box that will allow us to find a contact by either Name or Email address.
In the meantime, hit Publish and choose Only Me to try out your swanky new app on a Smartphone.
Prefer to watch the action? Try our series of short video tutorials.
Need more detail? Try the Reference Guide section instead.
Can't find what you're looking for?
If you can't find the answer to your problem here, please contact Nutshell's support team via our dedicated help desk.
![]()
Floor 1, Baltimore House
Gateshead, Tyne and Wear
NE8 3DF
United Kingdom